I had decided a while back that I sorely needed to upgrade the fueling system on my 1978 K10. I was tired of that Edelbrock carb. It never seemed to run quite right and the more I played with it the worse it got (probably because I kept messing it up more and more each time I took it apart). Worse yet, once I moved to NJ, I needed to be able to pass an emission test and the carb was certianly not up to the challenge. If I was going to spend money, I'd rather it be on and EFI system than on having the carb rebuilt. I had done some work on developing my own EFI system for a school project, but I still had a lot to learn about assembly programming and the relation of the electronics, software and engine dynamics itself. I came across the MegaSquirt EFI kit. one day, and found a whole community dedicated to DIY EFI. For $120 I got a PC board, and components and a great way to dig into assembly programming, motorola chips and the mysterious world of EFI. What follows are the details my installation in 2004.
Here are a couple links you may find of interest. Megasquirt has come a long was since I put this on. The new version has expanded capabilities to include full IAC control, timing control and a bigger fuel table. An engine and transmission upgrade is somewhere in the future for my K10 pickup and when that happens I will be upgrading it to the newest version of MegaSquirt.
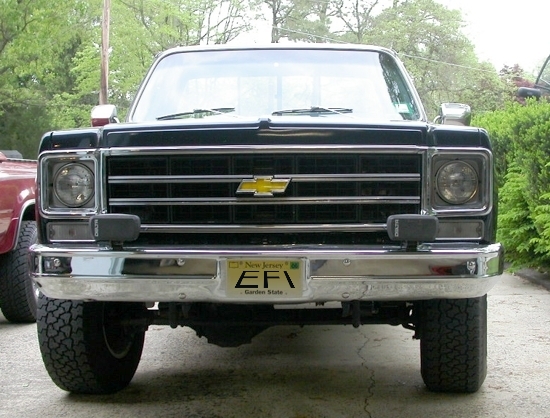
Here is a picture of my 1978 Chevrolet K10. It was just dying for EFI!
Parts List for my MegaSquirt Installation
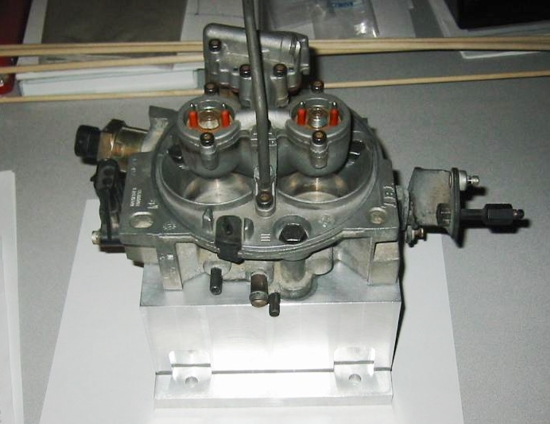
TBI assembly off a 1990 something Astro Minivan.
Heated O2 sensor off a Ford Festiva, Odometer said 37000 miles so I assumed sensor was probably still good. I was correct, works great!
New Fuel pump for a 1991 Fullsize GM truck.
Canister to mount my fuel pump in. I decided to use a surge tank, where the mechanical fuel pump on the engine keeps the small tank full and this contains the pressure circuit. This way I didn't have to drop both gas tanks and add fuel pumps and all the associated plumbing. Also if there ever was a MegaSquirt failure (although I doubt it), I can bolt the carb on and be able to get home.
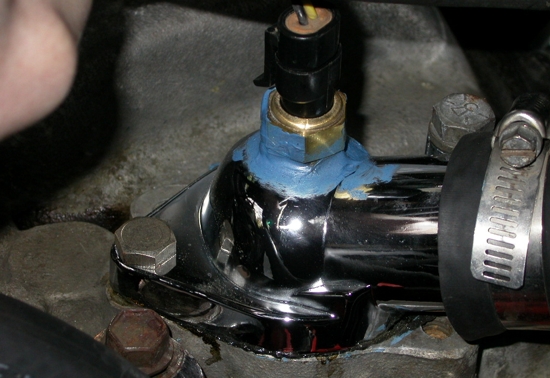
Two GM coolant temperature sensors, one to measure coolant and the other to measure air temperature.
Aftermarket air cleaner assembly. I had a chrome air cleaner that fit on the TBI just right.
TBI rebuilding kit. I did not want leaking seals and other problems, so it made sense to go through the TBI before I attempted to use it. By the looks of it, the old Astro van wasn't running real well towards the end, as the TBI was quite dirty.
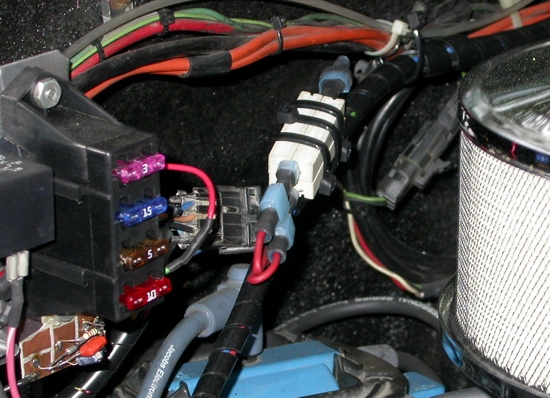
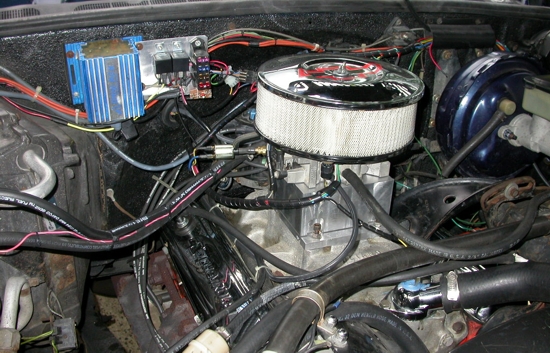
Relays, fuses, wires and a bunch of random connectors. I didn't buy a relay board, so I made my own. I mounted the fuses and relays on a piece of tin on the firwall next to the ignition controller.
Water neck. I had to drill and tap a hole in a water new water neck so the coolant temp sensor would measure the temp of the coolant. Initially I used a chrome one I tapped but its not very thick and long term the sensor could break off or the tapped hole leak. My dad had a factory one that GM used for a temperature switch. This has been swapped in and there will be no issues with breakage.
The MegaSquirt Kit, can't put one on without it!
Time... lots of it. This if DIY, so I took time and tried to do things as carefully as I could, and not during the cold weather.
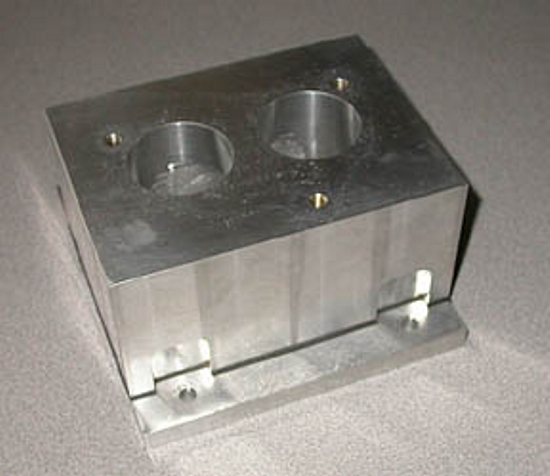
TBI to intake adapter. I made one myself with a big chunk of aluminum and the mill at work. When I could see lots of aluminum chips fly, I knew I was on the right track!
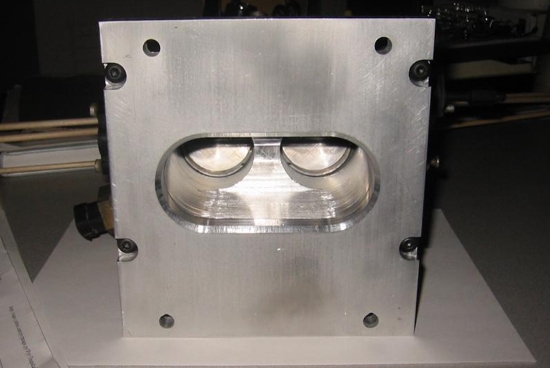
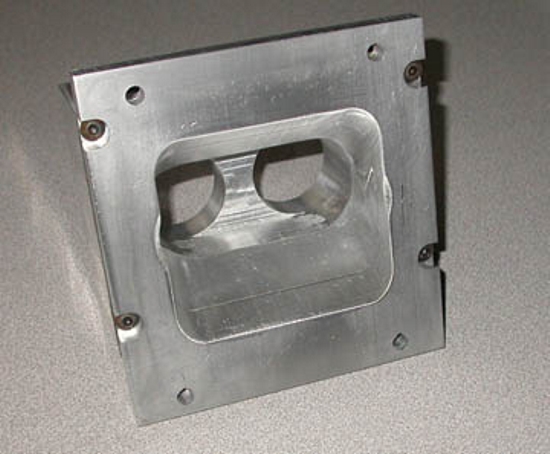
TBI to Intake Adapter
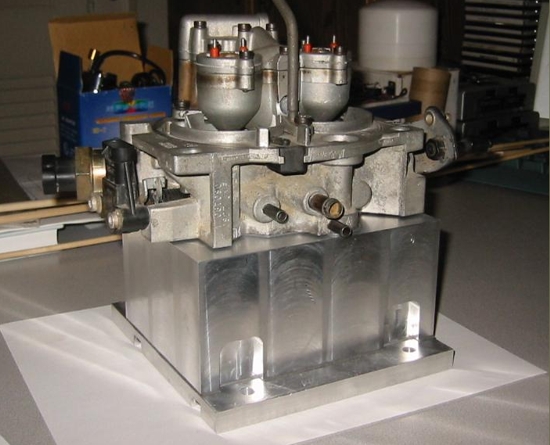
I had a TBI intake, but to keep the installation simple I did not wantto get into swapping intakes. One reason was that until I am sure the MegaSquirt system is running and there are no problems with my soldering, wiring or other parts I can still bolt the old carb on in about 15 minutes and get back home (much cheaper than a tow). In order to do this I needed to make an adapter that would fit between my intake bolt pattern and the TBI bolt pattern.
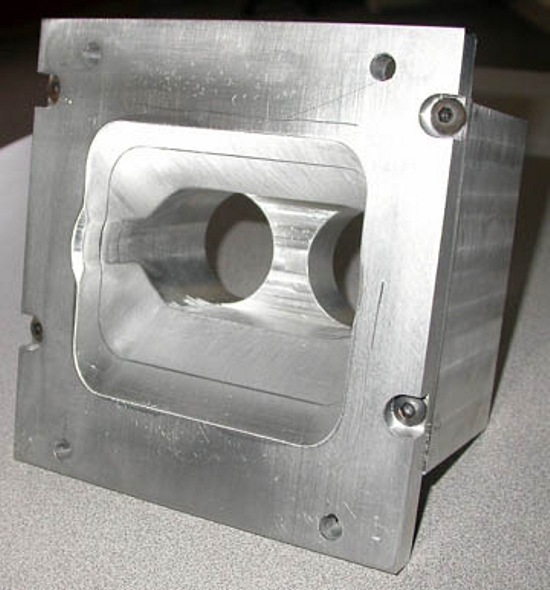
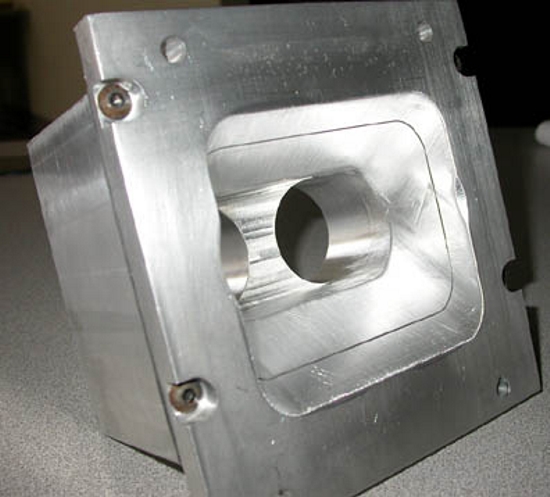
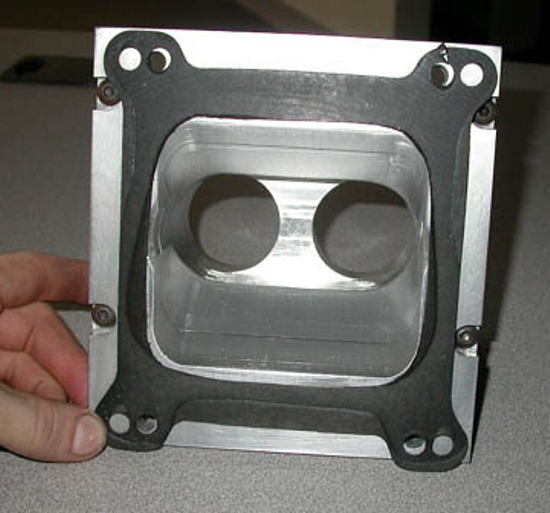
I decided to make a two piece part with a bottom plate that bolted to the intake and a top block that would bolt to the bottom plate. The TBI would bolt on top. The two pieces would bolt together first and no bolts would be anywhere where they could come out and accidentally be drawn into the intake. Also, since at some point I may want to play with water injection, the block was designed quite tall to allow for bosses to be machined in later and secondary injectors added below the throttle plates. Here are some pics of the adapter with the TBI bolted to it. I spent about 10 hours on the mill with this. First, I needed to square up and size the block and lower plate. Then to machine with the boring bar to slowly make the big holes in the center.
The adapter did not flow quite as well as I thought. It made a rather pronounced whistling/sucking sounds at part throttle and really seemed to choke flow at near WOT. After thinking it over I realized that I probably needed to fan it out more since the intake has a huge square hole and I really want to distribute the air fuel charge down and then sideways both ways on the intake. I went in and remilled the mating end to the intake to bring this out for better flow and match the opening as best I could. I still have plenty of room for water injectin if I get to it, and this rework will probably help that mix better as well. With this change, the whistling was diminished and the driveability was much improved.
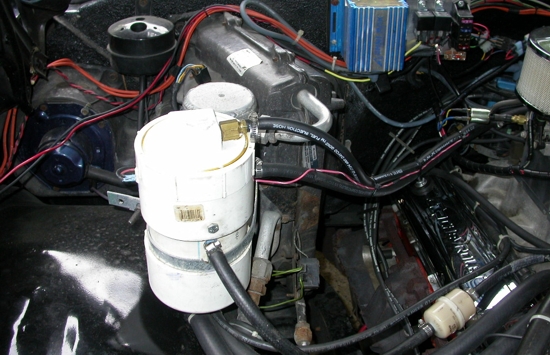
Surge Tank
The thought of dropping both tanks on my truck, buying two fuel pump assemblies and then trying to run all the associated fuel pump pressure and return lines sent shivers down my spine, I decided that it would be much easier to make a surge tank. I actually had one made up from some earlier EFI attempts, so with a little work I had that unit working. I used some 6" PVC tube glued together with a cleanout plug on the end. A float assmebly from a quadrajet is used to keep the unit full via the mechanical fuel pump on the engine. The EFI fuel pump sits down and I used some clear hose with internal braiding to connect the pump to the brass barb where it comes out of the tank. I tried a variety of different rubber hoses (even the EFI hose) for this internal hose and most seemed to puff up and be slowly destroyed by the gasoline. None gave me much confidence in a long lasting hose that wouldn't burst leaving me with no pressure and hence no running MegaSquirt. What I did find that seems to work was hose at Home Depot normally used for the kitchen sink sprayers. Its a clear hose with a white braid inside. Its quite a hard plastic and with a little heat from a lighter becomes quite rubbery to fit over the barb and pump ends. Then once cool it becomes hard again. I used this and clamped it down with hose clamps. So far it has stood up real well under the gasoline environment (as has the whole PVC canister) and seems perfectly happy with the pressure of the pump. The total volume of the canister is less than 1/2 a gallon. The one problem I did have was gas splashing up and working its way up the threads on the cleanout end. I made a cover that sits over the pump from an AOL internet CD tin package that helps keep the fuel from splashing around and then liberally applied grease to the threads and screwed the cover down. No leaks so far and no other issues with the tank. I thought about replacing the tank, but I've put a couple thousand miles on it and its been on there since 2004 and hasn't had any issues, even after sitting all winter.
Wiring and the Harness
I am using low impedence injectors, so I added some ballast resistors to keep the current draw down to protect the drivers on the MS. Unfortunately Radio Shack (you've got answers, we've got questions) only had 1 Ohm and 10 Ohm power resistors in stock, so I ended up putting tow 10 Ohm resistors in parallel to get and additional 5 Ohms plus my injector resistance. I am still running in peak and hold mode at about 70% duty cycle so I think that I am still getting good response from the injectors, but also giving myself a good current limit and not having to worry about accidentally watching my driver try to send smoke signals to me from under the dash. The flyback mod is the standard stuff on the V2.2 board. I noticed no components getting hot during my initial runs and all seemed well in the MegaSquirt case. Below is a picture of the ballast resistors. I have them wired in with connectors so when brave enough I could pull them out and try and set up the peak and hold with no ballast. Also you can see where all my wires enter the cab through a rubber grommet in the firewall. The little circuit board on the bottom of the relay/fuse board was unused. I was worrried about the large flyback from the tach signal and so I had built a low pass filter with a 12V max input limit. I ended up picking a nice TTL signal off the ignition instead, so I didn't need this. I just haven't removed it yet.
Sensors and Placement
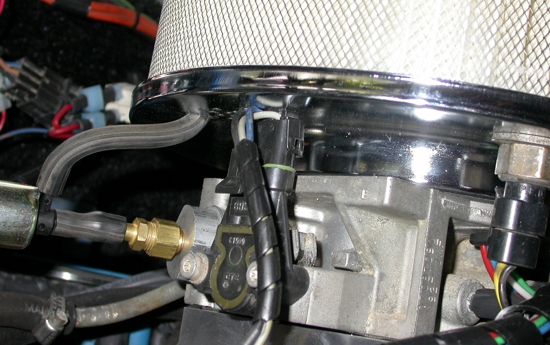
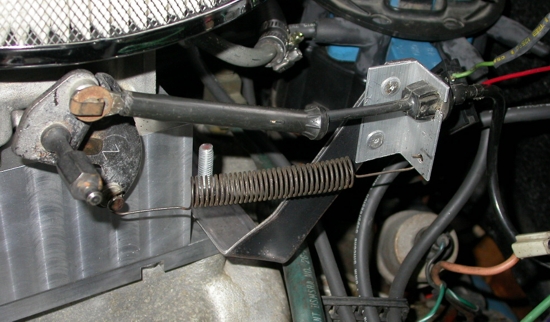
For sensors I used the standard TPS on the TBI, two standard GM temperature sensors for coolant and air intake, a heated O2 sensor and the MAP sensor that shipped with the MegaSquirt. For the air intake I cut open a colant sensor to expose the thermistor and siliconed it so it wouldn't bend and break off, but left the thermistor exposed to the air for quicker response. I mounted this in the air cleaner assembly just inside the filter. I had planned on mounting the coolant sensor in the intake in a port that was desinged for this, however this port had a plug in it, and due to 10 years of the plug being in that hole, I could not get it out, no matter how many tools I pounded into it or how hot I heated it with a torch. Instread I decided to put the sensor on top of the water neck which houses the thermostat. I has to drill and tap this and so far it seems to work. It is quite thin and so that is whay I have a bunch of silicone on it to help prevent any leaks since the sensor only engages 1-1/2 threads. I have an actual factory housing made for a temp switch that my Dad found after, and that has been swapped in since these pictures were taken. The only bad point about installing it after the thermostat is that as the engine warms up, the temp sensor only creeps up to about 90 deg F (since its on the wrong side of the thermostat). When the thermostat finally opens, the huge rush brings the sensor temp up to 180 deg F or so in a few seconds, so you can usually hear the MegaSquirt go from warm up to normally running if you are idling. It doesn't seem to be a real issue and hasn't caused any drivability problems. For IAC control I am using a small solenoid to control this, you can see the air intake hose going inside the air cleaner. In the IAC hole itself I made a plug that seals the passage off and only lets air from the hose barb on the plug to bypass the throttle plates. The air solenoid is a bit small so you only get a small raise in idle with this setup, so I had to tune the warmup extra well to avoid any start up problems. I also had to make a bracket to hold the throttle cable so that it was the right height and distance from the throttle hookup itself. I bent a piece of flat stock and bolted it to the studs that bolt the TBI adpater to the intake. Riveted on the side is a piece of alum angle with the type of cutout that the standard GM throttle cable snaps into. It works real nice and gives me full range on the throttle plates. it has since been painted blue.
MegaSquirt Mounting
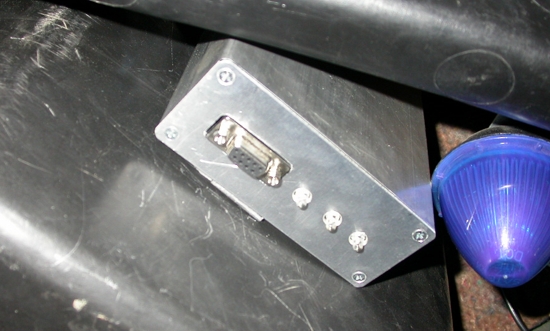
I mounted my MegaSquirt behind my glove box basically on top of the big box that controls all the inside/outside/heat/air conditioning. There was a braket on the cab for some other module (the cab is from an 84 truck so I don't have this module in here) and I was able to make a bracket that is riveted to the MegaSquirt case and hangs down from this bracket. The connector and map sensor line point up and the wires go up and to the left and out the firewall. The LED's and serial plug point down toward the floor on the passenger side. The box is just out of site and at night you can see the red LED's reflect off the floormat (esp the accel enrichment when you punch it!) Below is a picture looking up under the dash. The big blue light is one of my interior lights.
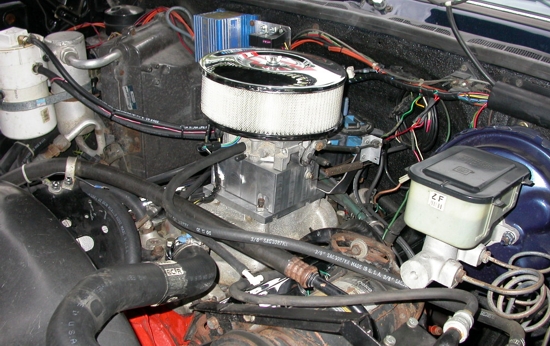
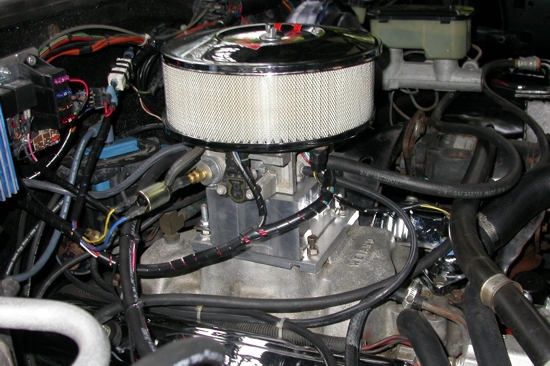
Engine Bay
Below are a few more pictures of the final installation. The engine bay is quite clean and I used spiral wrap to clean up all the wiring. I have connectors between all connections from the relay board and MegaSquirt harness. All original sensor plugs were used and so if any fails, replacement and service should be quite straighforward.
MegaSquirt Parameters and Settings
Overall I have put about 2000 miles on it and am getting about 12-14 mpg. I still need to do more work on the VE tuniong and other settings. Unfortunately from 2006 to 2008 I have not had the time to mess with the truck much, so I took the insurance and registration off and it sits quietly covered in the garage, only to be pulled out and let run occasionally. Each time I have pulled it out it fires right up and runs like a champ. Here are all settings in the MegaSquirt as of right now using the standard TBI fuel pressure regulator and 4.3L injectors (6g/sec) 47-48 lb/hr flow. The engine is a stock 5.7L, 1976 block, probably about 8:1 compression. Wieand Alum intake, RV cam, high volume oil pump, Jacobs Omni Pak ignition, timing at factory specs.
Warm Up Enrich bins: -40 F (185), -20 F (185), 0 F (180), 20 F (175), 40 F (170), 60 F (155), 80 F (125), 100 F (110), 130 F (105), 160 F (100)
EGO Settings
Coolant Temp Activation: 120 Deg F
# Ign events between steps: 33
EGO Step: 1%
EGO +/- Limit 5%
EGO Active RPM: 1100
EGO Switch Voltage: 0.5 V
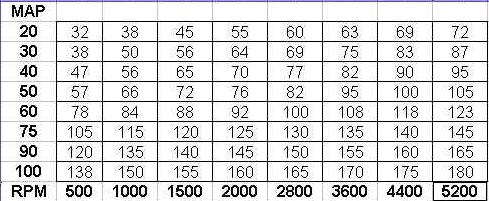
VE MAP
Future Plans?
I had thoughts of one day playing with water injection, but I just have not had much time for anything more than what you see here.
I do want to upgrade the drivetrain sometime with a 383 stroker with a TPI and a 4L80E transmission and a TMC paddle shift valve body. When I do that I definetly will upgrade to a MegaSquirt that can do fueling and ignition timing.
Thanks for reading my MegaSquirt page. I would like to thank Bruce and Al for the great job they have done bringing an affordable EFI system to the DIY community. It's been a fun item to play with and the reliability has been fantastic.


 I had decided a while back that I sorely needed to upgrade the fueling system on my 1978 K10. I was tired of that Edelbrock carb. It never seemed to run quite right and the more I played with it the worse it got (probably because I kept messing it up more and more each time I took it apart). Worse yet, once I moved to NJ, I needed to be able to pass an emission test and the carb was certianly not up to the challenge. If I was going to spend money, I'd rather it be on and EFI system than on having the carb rebuilt. I had done some work on developing my own EFI system for a school project, but I still had a lot to learn about assembly programming and the relation of the electronics, software and engine dynamics itself. I came across the MegaSquirt EFI kit. one day, and found a whole community dedicated to DIY EFI. For $120 I got a PC board, and components and a great way to dig into assembly programming, motorola chips and the mysterious world of EFI. What follows are the details my installation in 2004.

 TBI assembly off a 1990 something Astro Minivan.