I bought my first vehicle in the summer of 1993 before my senior year of high school. It was a 1978 Chevrolet Cheyenne 4x4. It was the shortbox version and had most of the options available for that year. I paid $1500 cash and had my first set of wheels (although it did need a bit of work). The previous owner had reworked the body as he worked at a body shop. "Reworked" is the key word as there was a lot of body filler to that rework and not enough replacement panels. I drove it for the next six years and always washed it and maintained it, but the salt covered winter WI roads took their toll on the poor bodywork and the steel underneath. By 1999 the truck was looking rather rusty and crusty. I had even started referring to it as Crusty. Well, it was a name that stuck as even today, I still call it Crusty. But luckily, Crusty is rusty no longer.
In 1999 I was still in college, grinding my way through engineering classes. I had saved some extra cash from my coop the year before and so I decided that this was the summer Crusty was going to be rebuilt. Before the semester was out I had ordered off and gotten new doors, fenders, trim, carpet, blinker lenses, window seals, and a variety of other parts. I had already located and had shipped home a good rust free 1984 cab from Montana and also located a good bed from somewhere in the southern US. I arrived home for "vacation" and immediately got to work on what would be 3.5 months of frenzied activity to rebuild my truck before I had to drive it back to school in the fall. I still remember standing in the garage at the end of July with an engine on the engine stand, two axles on the floor and the transmission and transfer case off to the side, thinking... this is all that's left, everything else is off to paint or elsewhere and I really don't technically have a truck anymore! Am I really going to get this all back together before school starts!? I must be nuts! Well yes I was nuts. But I did get it back together just in time to head back to school.
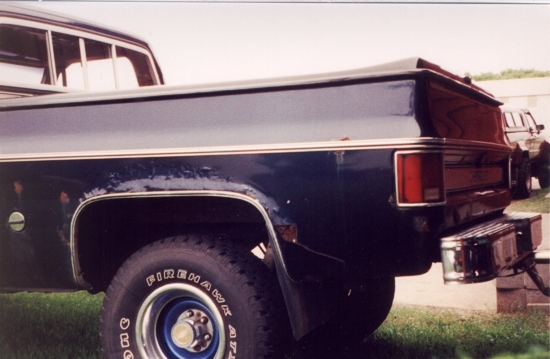
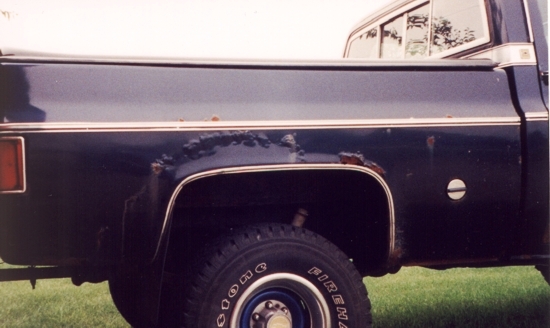
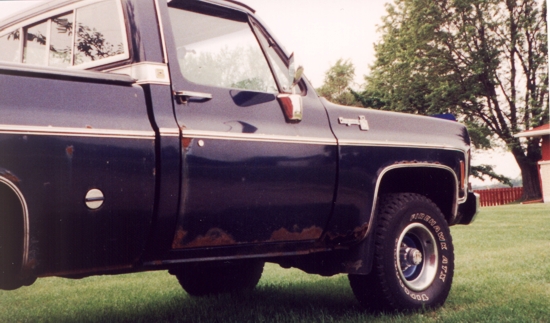
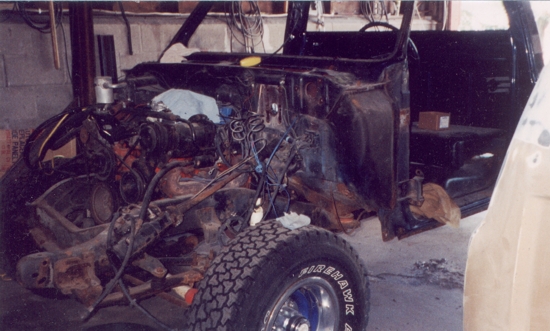
Below are some pictures from before I started. You can see the excessive rust and bubbling body filler. There was no reusing most of the bodywork. In fact the only pieces I reused were the hood, core support and metal dash that I needed to transfer from the old cab to the new one so all the 1978 hardware would fit inside.
The first step was getting the "new" bed ready. One of the bedsides needed to be replaced and the rest needed to be cleaned up. I took the entire bed apart and cleaned up each piece. Even though this was a "rust free" box from the southern part of the US, there was still surface rust in all the seams where it bolted together. I cleaned all these seems and used a product called Oxisolv rust remover to dissolve the rust and leave a clean surface. I bought this from the Eastwood Company. Additionally any sheet metal that wasn't going to be painted, got covered with 2 coats of a roll in bedliner called Herculiner. The entire bottom of the bed, cab, inner fenders, up inside the bed, firewall, the floor of the cab, and the inside of the bumpers were all coated with this. This helped with rust protection as well as kept the costs of painting body panels down since there was less that needed to be sprayed.
During this time I also began tearing the truck itself apart. The frame needed to be stripped so it could be sent off for sandblasting and paint as well as all the other suspension parts cleaned up.
I ended up having to do a lot of work on the suspension. I had bought a Skyjacker 2-1/2 inch lift kit a few years back and I have to say, the quality was marginal. The actual spring leaves themselves are not primed, but rather dipped in some type of cheap enamel. Hence, even after a couple years, they look quite rusty and used. I also had trouble with a very rough ride. I ended up taking one leave out of the front, and using double nuts on the front bolts, rather than torque them to the factory specs of 90 ft-lbs. When they were torqued to the factory specs, they had crushed the spring mounts into the urethane bushings and inner sleeves, making it impossible for any real pivot movement from the front spring mount. By using a double nut, I was able to keep the torque on the spring bolt to about 10 ft lbs, but be assured that the assembly wouldn't come off. The difference in ride was dramatic. Additionally, I sandblasted, primed and painted each individual leave before reassembling the suspension.
The cab was particularly a lot of work. Since the new cab was from a 2WD 1984 truck, there were two major differences. The transmission tunnel was much lower (and would not clear the transfer case and transmission from the '78 ) and the metal part of the dash was for the '84 hardware, not the '78 hardware!. I had to carefully chisel about 50 spot welds along the lower windshield lip to remove the dash from the original cab (and also remove the dash from the '84) and re-weld the '78 dash into the 84 cab. Next I located a transmission tunnel from an '86 4x4 at a local salvage yard. I cut this out and brought it home. The original '78 cab had a removable tunnel and I wanted the same thing on the '84 cab. I cut out the floor where the tunnel was in the '84 cab and fabricated so that the '86 tunnel I got would fit in like a glove. I drilled bolt holes around the outer edge and welded nuts to the floor of the '84 cab. The new tunnel now would bolt in place in the '84 cab just like the original '78 cab tunnel had bolted in place. I also welded up the seams along the rocker panels, cleaned and rust-proofed the seam where the kick panel meets the floorboards, changed the holes on the firewall to fit the '78 wiper setup, welded the holes up for the '84 hood hinges and welded up holes in the roof from where someone had a visor and antennae on it.
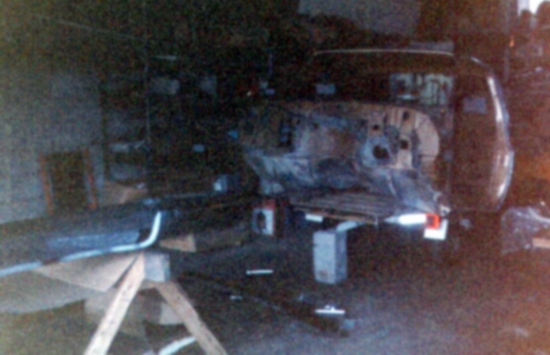
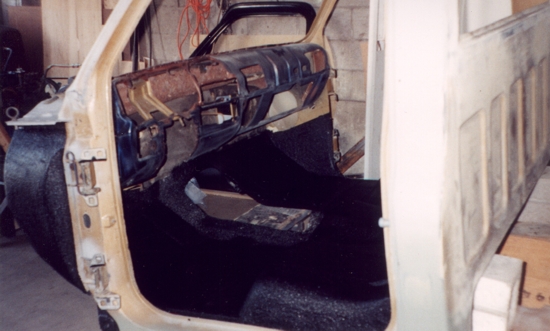
Here is a picture of the cab, ready to goto paint with the floor painted with Herculiner and the rest cleaned up and ready to go.
Once the frame was stripped, I sent it off to Pulaski Sandblasting where it was sandblasted, primed and painted with a semi-gloss black paint, normally used to paint dump trucks. This paint isn't quite as hard and is much more resistant to chip when rocks hit it (hence the reason its used on dump trucks). All the body parts were painted individually by the body shop guy at McDermid Trucking. As hard as I looked, I could not find a blue in the GM book I really liked. I did however find a blue in the Ford book I liked and that was what I ended up using as the paint color for the truck (Don't kill me GM enthusiasts!).
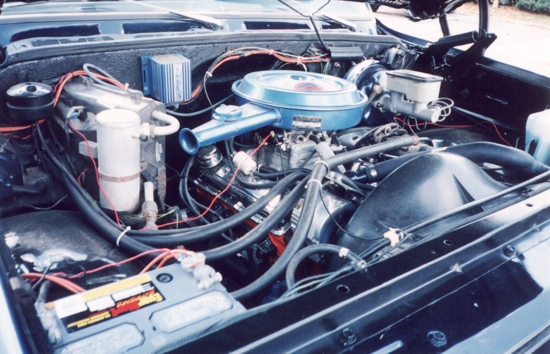
With everything off to paint and cleanup, I turned to what was left. The engine was in good running order, but needed to be resealed and cleaned. I repainted the block GM orange, and used new leak proof gaskets from Summit on both the valve covers and oil pan. The transmission was cleaned up, bell hosing painted and new seals installed where necessary and the same with the transfer case. I also decided to clean up the axles and that included draining and flushing the rear differential. What a surprise when I went to drain it and chunks fell out! The old gov-lock had at one time exploded and the shrapnel had toasted the rest of the differential. There was nearly a whole tooth missing out of the pinion gear and with metal that had flooded the whole rear end, everything was no longer reusable. I had to wonder how long I had been driving it like this. I located a good used rear from a '74 truck at a local salvage yard (with an Eaton heavy duty posi) and cleaned this up for installation. My dad rebuilt the rear drum brakes and we were ready to start reassembling the vehicle.
Once the frame came back, it was like a big Lego set. Springs were reassembled, axles bolted on, shocks installed, motor, transmission, transfer case, gas tanks all bolted on. Before I knew it, I had an assembled frame and drivetrain again! Next the body parts started coming home from paint. With the motor and transmission installed we set the cab on (I have to thank Tom Jensen, Tim Kamm and Jeff Polzin for helping me with this, even though they almost left when I told them it was a Ford paint color!) and I began the task of refitting the wire harness. There were some bad spots I needed to cut out and rewire. I used some GXL automotive wire and was able to rebuild the harness as good as new. Additionally since the '84 cab came with power windows and door locks, these were cleaned up and wired in to the main harness. I also upgraded to the heater and air conditioner controls out of the '84 cab since it was a much better designed setup. Next we started fitting inner fenders, the core support, front fenders and the doors on. My good college friend Kevin Bina came up for a weekend to help with my madness and I found I was starting to have a truck again. At this point, the engine and ignition was wired up and it was time to fire it up and see if it would run again. After blowing up one battery charger (I guess the 75 amp setting doesn't mean you can sit there and crank an engine over) we finally got it to fire up and it ran with no problems. Next, I hot rodded it down the road to Bob's Service in Krakow to have a new exhaust put on. I say hot rodded it as there was no hood, no bed, running right off the manifolds, and really no blinkers or tailights. It was a lot easier for him to bend and install the exhaust without all this on and it came out great.
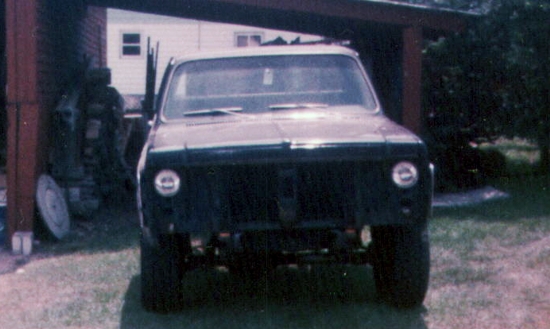
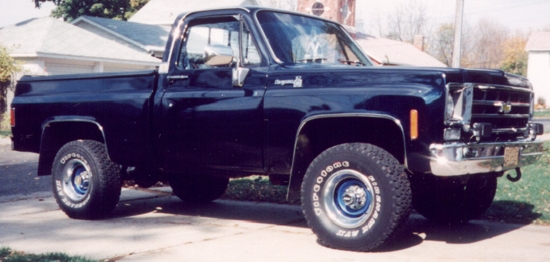
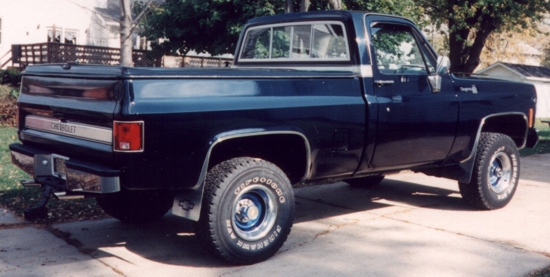
Next was the final body assembly. The bed and hood were bolted on and blinker lenses installed and wiring finished up. I also make up some aluminum mud flaps from flat sheet aluminum and riveted them on as well. We found the front locking hub was messed up as well, so Dad spent a day installing an aftermarket locking hub set. Most of the truck was together but I was still down to the wire. I was up till 4 am the day before I was to head back to school installing the stereo, carpet and seat. I added some purple neon lights under the seat and can cruise in a sweet purple glow at night as well as a neon blue license plate frame, which I cannot ever really turn on as I would surely attract the local patrol officers attention. But, it looks cool! There was still a lot of small things to do yet like rework the door panels, finish wiring in some other accessories, but the vehicle as a whole was back together and ready to hit the road. I loaded up my college belonging and headed back to school hoping I had remembered to tighten every nut and bolt!. Here are some pictures of it after I arrived back at school.
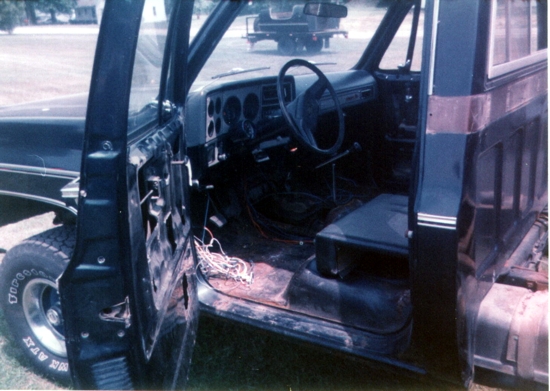
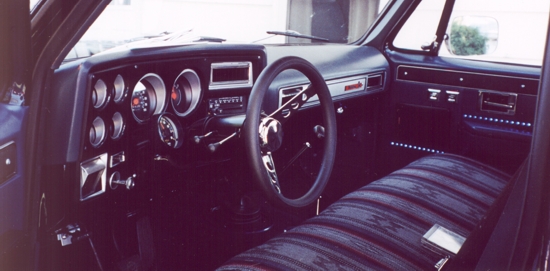
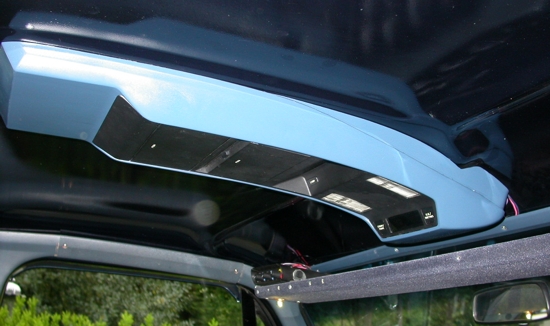
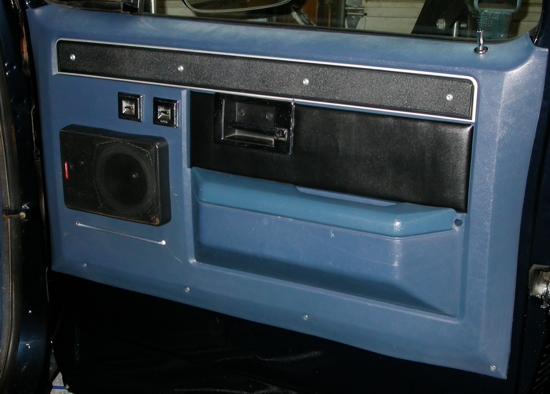
I reworked the interior adding an overhead console (with lights, exterior temperature and compass display) from a Dodge minivan. I also repainted the door panels from the '84 cab and added some blue LED lights to them. While it seemed a good idea, I found out at night a single LED isn't real bright. 100 of them light up the interior light daylight. I'd have to revisit that at a later time. Here are some pictures once I got the interior together.
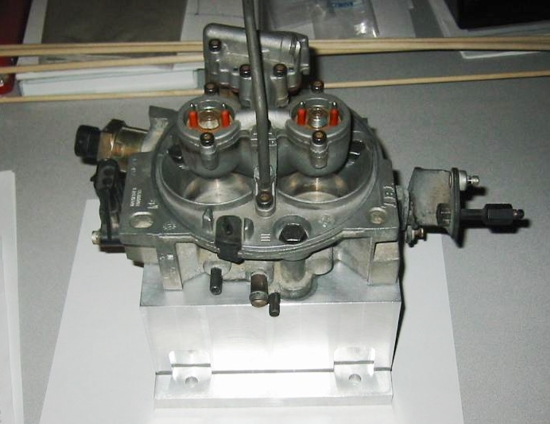
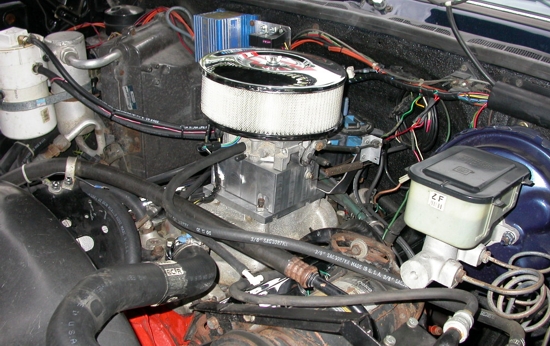
One of the bad things is that a project is never done. That includes this vehicle. In April of 2003 I had had enough of the carburetor and decided to fuel inject it. No more stuck floats, no flooding the engine and no having to rebuild the carb I had taken apart way to many times and messed something up. I put on a MegaSquirt V2.0 EFI computer and it was a real improvement. It run like a champ with it. Below are a couple of pictures, but see my MegaSquirt Installation page for details.
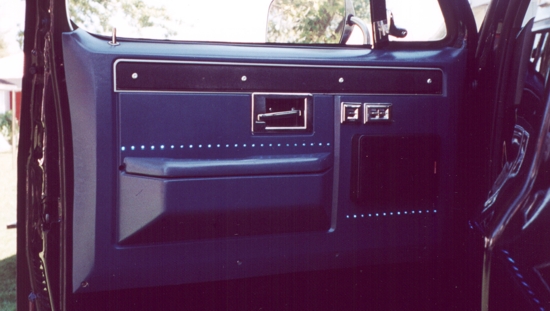
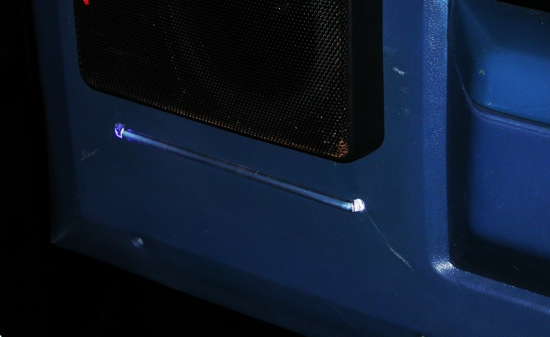
I also happened to trip over a set of door panels at a salvage yard shortly after this. These were blue door panels out of a mid-80's Suburban and I got them for a steal. I reworked them and my LED light idea. This time I used 2 LEDs that would illuminate a piece of translucent acrylic that came out and ran along the door panel. Much more subtle, and gave a nice glow to the door panel at night. The new door panels look much better and turned out better than the old ones.
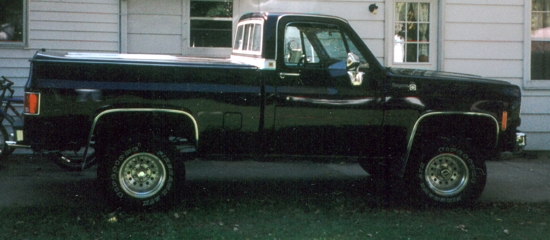
So here are the cuurent specs on my 1978 K10 as it sits:
1978 Chevrolet K10 4x4, Cheyenne Trim Package
5.7L V8 Engine
Manual Transmission (SM465)
NP205 Transfer Case
Part Time 4WD with Manual Hubs
Air Conditioning
Tilt Steering Wheel
MegaSquirt EFI (fuel only)
Jacobs Electronics Ignition
Power Windows/Door Locks
Dual Exhaust
Fiberglass Bed Cover
32 x 11.5 x 15 tires on Aluminum Deep Dish Rims
CD Stereo w/Door and Rear Speakers
Like I said, a project is never done. I learned some important items rebuilding this truck, they are:
Cutting a corner to save a few $$ means you will have to do it again and spend 10X the $$
Aftermarket body parts are indeed aftermarket, they don't fit and rust all by themselves
So there are still a few things I want to rework and upgrage. One dissapointment is the aftermarket body parts. Both doors have some rust starting under the paint along the bottoms. Granted its hard to notice, but it shows the quality of the parts. Not only that but the fit of the doors and fenders are marginal. I'd like to get NOS GM fenders and fiberglass doors and have the truck repainted. This would look much better and drop a few pounds.
I also found a kit that will get rid of the vent window on the doors. These always leak air and give a constant wind noise when driving. The kit I found that replaces it with a one piece window like the later model trucks. Sounds like some trick fiberglass doors with one piece windows are in the future!
Also the drivetrain is seeing its age. The MegaSquirt works well, but I'd like to upgrade it to a V3.0 for full spark control and mount in a top a 383 stroker with Vortec heads and a TPI setup. Behind this add a 4L80E transmission with a TMC valve body and paddle wheel shifitng on the steering wheel. Additionally the transfer case could use a rebuild and the rear axle is showing its 100k miles of service.
I'd like to upgrade the seat from a bench seat to a later models set of seats with a center console. This old seat is just that, an old seat! Time for something a bit more road worthy.
Additional it would be nice to add a rear disc brake conversion kit to keep things stopping as well as can be.
Ah, the work is never done! Thanks for visiting my page on my truck. I hope it's provided some insight and feel free to ask any questions.